IIM Integrated Email Auto Responder’s
Integrated Autoresponders
Click on the autoresponder you use to see the integration details for it.
ActiveCampaign
AutoPilot
Aweber
Benchmark
Birdsend
ConvertKit
Email Octopus
GetResponse
Hunter
Mailchimp
Mailjet
Moosend
Ontraport
SendEagle
Sendiio
SendLane
SendPulse
SendShark
Sendy
Self Hosted Autoresponder:
Sendy
i) For more details or to purchase the software for Sendy – Click Here
ii) Please see installation instructions on Sendy website. If you prefer, they can install it for you for a nominal price.
iii) Login to your Sendy installation and go to the dashboard
iv) Go to Settings in the top right corner. Find your API Key and copy it.
v) In your Sendy account, select a Brand and on the left click View All Lists. Copy the List ID of the list you wish to use
vi) Go to your IIM dashboard and click the Email System link in the left hand menu
vii) Select the Sendy system in the dropdown and add the information you collected above

Autoresponder Services:
Aweber
i) For more details or to sign up for Aweber – Click Here
ii) Login to Aweber and go to the dashboard.
iii) Click on Manage list top screen
iv) Create list and get list id from there
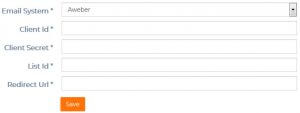
vi) Go to your IIM dashboard and click the Email System link in the left hand menu
vii) Select the Aweber system in the dropdown and add the information you collected above
Birdsend
i) For more details or to sign up for Birdsend – Click Here
ii) Login to Birdsend and go to the dashboard.
iii)Click on Setting>Integration>Birdsend App>Create New app and after creating you will get a general personal access token from there. Copy the Access Token
iv) Go to your IIM dashboard and click the Email System link in the left hand menu
v) Select the Bird Send system in the dropdown and add the information you collected above
ConvertKit
i) For more details or to sign up for ConvertKit – Click Here
ii) Login to Convertkit and go to the dashboard.
iii) Click on your avatar in top right corner.
iv) Account Settings>API Secret” section
v) Get form id from when you add subscriber and form id show in url
vi) Go to your IIM dashboard and click the Email System link in the left hand menu
vii) Select the ConvertKit system in the dropdown and add the information you collected above
Get Response
i) For more details or to sign up for GetResponse – Click Here
ii) Login to GetResponse and go to the dashboard.
iii) Go to menu on the top left of the account and then click Integrations & Api
iv) Go to Api section (most probably 3rd section )
v) click on generate api key button.
vi) then click on the generate key button in the popup..it will automatically generate the api key for you(It will be your api token/key)
vii) Now for the list id go to lists from the top bar
viii) you can make a new list or can use the default list
ix) now for the list id ,hover on 3 dots at the end of each list record and then click on settings
x) you will see the list token just below the list name field ..most probably 4-5 characters..copy the list token
xi) after the above steps you will have both api token/key and also the list key/token(campaign ID)
xii) These two values you have to input for completing the get response integration
Ontraport
i) For more details or to sign up for Ontraport – Click Here
ii) Login to Ontraport and go to the dashboard.
iii) Click on Avatar icon at top right and click on Administration>Ieft side Integration> Ontraport API Instructions and Key Manager > click on create api key and fill information and copy api key and app id.
iv) Go to your IIM dashboard and click the Email System link in the left hand menu
v) Select the Ontraport system in the dropdown and add the information you collected above
Hunter
i) For more details or to sign up for Hunter – Click Here
ii) Login to Hunter and go to the dashboard.
iii) Click your account icon at the top right
iv) Click on Api key and copy the api key
v) Go to your IIM dashboard and click the Email System link in the left hand menu
vi) Select the Hunter system in the dropdown and add the information you collected above
MooSend
i) For more details or to sign up for MooSend – Click Here
ii) Login to MooSend and go to the dashboard.
ii) Click on top right Account section and after that api key.
iii) Copy the api keys.
iv) Create mail list id from mailing list in dashboard.
v) Go to your IIM dashboard and click the Email System link in the left hand menu
vi) Select the Moo Send system in the dropdown and add the information you collected above
Mailchimp
i) For more details or to sign up for Mailchimp – Click Here
ii) Login to Mailchimp and go to the dashboard.
iii) Click your name in the top right and select Account profile to get your username.
iv) Then click the Extras menu and select API keys. Get the API key you wish to choose.
v) Then click on create api key if you haven;t created one. Copy the api key after generating it and paste it somewhere
vi) Now we need list id …for that click on audience——>audience dashboard from the top bar. If you have more than one audience, click the Current audience drop-down and choose the one you want to work with.
vii) Then on the audience page click on manage audience and click on view audience
viii) On this page you will see the lists in your account…click on the arrow right next to stats for a particular list and then click on settings
ix) Scroll down and you will see a field for unique id which will be your list if which you have to input when adding the mailchimp emailer in the iim dashboard
x) In the Audience ID section, you’ll see a string of letters and numbers. This is your audience ID (List ID).
xi) You need api key,username and unique list id for mail chimp integration
xii) Go to your IIM dashboard and click the Email System link in the left hand menu
xiii) Select the MailChimp system in the dropdown and add the information you collected above
Mailjet
i) For more details or to sign up for Mailjet – Click Here
ii) Login to Mailjet and go to the dashboard.
iii) Click on the user name at the top right
iv) In the rest api section, click on master api key and secret management you will see the api key and secret key
v) Go to your IIM dashboard and click the Email System link in the left hand menu
vi) Select the Mail Jet system in the dropdown and add the information you collected above
SendPulse
i) For more details or to sign up for SendPulse – Click Here
ii) Login to SendPulse and go to the dashboard.
iii) Click on your account at the top right and go to account setting. Then click on api and copy client id and secret id.
iv) You will get list id from create new list.
v) Go to your IIM dashboard and click the Email System link in the left hand menu
vi) Select the Send Pulse system in the dropdown and add the information you collected above
ActiveCampaign
i) For more details or to sign up for ActiveCampaign – Click Here
ii) Login to ActiveCampaign and go to the dashboard.
iii) Click on setting on the left side.
iv) Copy account name before .activehosted.com
v) Click developer and copy api key
vi) Go to the Lists page and click on the list you wish to use for IIM. The List ID will be seen in the url
vii) Go to your IIM dashboard and click the Email System link in the left hand menu
viii) Select the ActiveCampaign system in the dropdown and add the information you collected above
Sendlane
i) For more details or to sign up for Sendlane – Click Here
ii) Login to Sendlane and go to the dashboard.
iii) Navigate to your Account tab and click on API
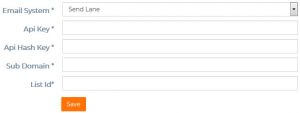
iv) On the API page you’ll see all of these unique identifiers you will need to get: API Key, API Hash Key and Subdomain
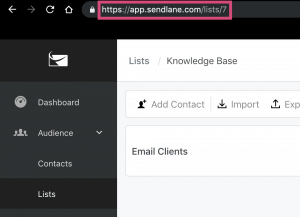
v) Then Navigate to Audience → Lists and select the list you’re interested in.
vi) Click into the address bar of your browser. Your List ID is the number at the end of the page URL. In the example below, the ID number is 7
vii) Go to your IIM dashboard and click the Email System link in the left hand menu
viii) Select the Send Lane system in the dropdown and add the information you collected above
Autopilot
i) For more details or to sign up for Autopilot – Click Here
ii) Login to Autopilot and go to the dashboard.
iii) Go to Settings.
iv) Go to “Autopilot Api”.
v) Click Generate.
vi) Copy the api Key.
vi) Go to your IIM dashboard and click the Email System link in the left hand menu
vii) Select the Auto Pilot system in the dropdown and add the information you collected above
Benchmark
i) For more details or to sign up for Benchmark – Click Here
ii) Login to Benchmark and go to the dashboard.
iii) Go to top-right side where your name is displayed… Click on your name and go to integrations.
iv) On the integrations page you will see the api keys tab. Click on that and the api key will be displayed to you.
v) To get the list id you just go to the home page of the dashboard you are logged in and then go to the Contacts tab on the right side.
vi) There will be two lists that will be displayed by default…click on any of the list to go to the list detail page and the list id will be displayed to you in the url.
vii) Go to your IIM dashboard and click the Email System link in the left hand menu
viii) Select the Bench Mark system in the dropdown and add the information you collected above
EmailOctopus
i) For more details or to sign up for EmailOctopus – Click Here
ii) Login to EmailOctopus and go to the dashboard.
iii) Click on create list button for create list.
iv) Click on created list and after that click on setting and get list id.
v) Click at top right your account and after that click on Integration and api for api.
Your Account>Integration and Api > developer Api and copy key.
vi) Go to your IIM dashboard and click the Email System link in the left hand menu
vii) Select the EmailOctopus system in the dropdown and add the information you collected above
Sendiio
i) For more details or to sign up for Sendiio – Click Here
ii) Login to Sendiio and go to the dashboard.
iii) Click on your name in top right and then Edit Profile. Copy the API Token and API Secret from your account settings.
iv) Click on Email -> Lists -> My Lists in left hand menu
v) Find the list that you wish to use for IIM and click the list icon for it in the List ID column. This will copy the Encrypted List Id to your clipboard. Save that info.
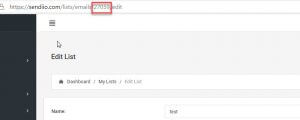
vi) Now click the gear icon at the right of this list to edit the list. When you are in edit mode, you will need the List Id from the url line as shown here
vii) Go to your IIM dashboard and click the Email System link in the left hand menu
viii) Select the Sendiio system in the dropdown and add the information you collected above
SendShark
i) For more details or to sign up for SendShark – Click Here
ii) Login to SendShark and go to the dashboard.
iii) On left side menu click Digital Products -> Email Autoresponder.
iv) Click on Campaign -> List. Now edit the list you want to use with IIM and copy Campaign ID from the url.
v) Now click on your account at the top right of the dashboard. Select Edit Account. Scroll to the bottom of the page and copy your API key.
vi) Go to your IIM dashboard and click the Email System link in the left hand menu
vii) Select the Send Shark system in the dropdown and add the information you collected above
SendEagle
i) For more details or to sign up for SendEagle – Click Here
ii) Login to SendEagle and go to the dashboard.
iii) Click on Profiles on the top bar. Find the Unique Identity ID. This is your Company ID. Copy it.
iv) Click Configuration from the top right bar and then click on Integrations. Copy the API Key from the API section.
v) Now click on your account at the top right of the dashboard. Select Edit Account. Scroll to the bottom of the page and copy your API key.
vi) From the blue menu bar, click on Lists. For the list that you want to use for IIM, click the settings icon at the end of the row and then click on Unique Identity. Copy the List ID.
vii) Go to your IIM dashboard and click the Email System link in the left hand menu
viii) Select the Send Eagle system in the dropdown and add the information you collected above
